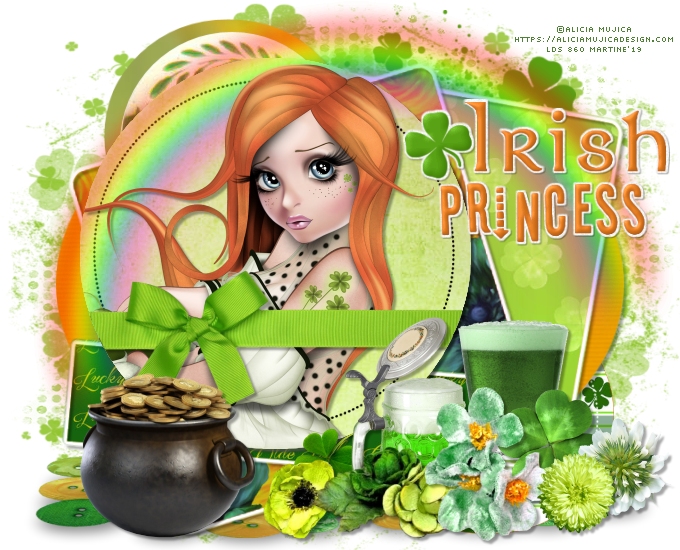
 You can do pretty much what you like with your result: create signatures with name added, extras or stats, websets. Give all the credits that are required.
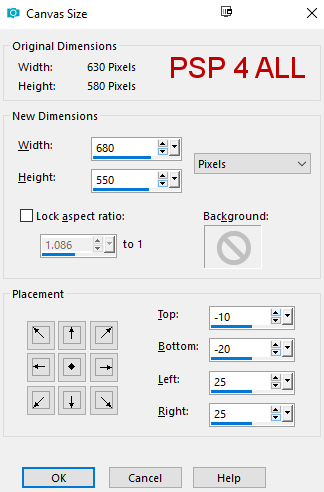
 Template : A Kan Dee St.Pattysday Collab - http://deessigndepot.blogspot.com by Dee and http://kandikisseztagz.blogspot.com (no longer online) - to download here. Choose the template KanDee-stpats-2013_6. Scrapkit: Olde Lucky - Tagger Size by Mizteeques. Download here. Mask: Mask Set 149_Mask1 by Rachel at Rachel Designs. Download here. Font: Pixelette for the credits. You can download my E-Book which will let you work without being connected. STEP 1 Open the template. Maj D Duplicate and save the original. Resize all layers to 90%. Then click on Image > Canvas Size and enter 680 x550.
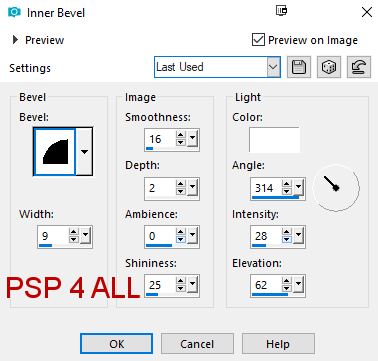
Close the layer Info. STEP 2 green bar - Selections > Select All. Selections > Float. Selections > Defloat.Click on paper Miz_OldeLucky_paper 3, resize to 50% and paste as a new layer. Selections > Invert > Delete. Selections > Select None. Add a Drop Shadow 3,3,35,3. Delete the original layer. ETAPE 3 orange circle - Selections > Select All. Selections > Float. Selections > Defloat.Click on paper Miz_OldeLucky_paper 6, resize to 65% and paste as a new layer. Selections > Invert > Delete. Selections > Select None. Add a Drop Shadow 3,3,35,3. Delete the original layer. ETAPE 4 yellow circle - Selections > Select All. Selections > Float. Selections > Defloat.Click on paper Miz_OldeLucky_paper 11 and paste as a new layer. Selections > Invert > Delete. Selections > Select None. Add a Drop Shadow 3,3,35,3. Delete the original layer. ETAPE 5 green oval - Selections > Select All. Selections > Float. Selections > Defloat.Click on paper Miz_OldeLucky_paper 5 and paste as a new layer. Selections > Invert > Delete. Selections > Select None. Add a Drop Shadow 3,3,35,3. Delete the original layer. ETAPE 6 yellow square - Selections > Select All. Selections > Float. Selections > Defloat.Click on paper Miz_OldeLucky_paper 12, resize to 75% and paste as a new layer. Selections > Invert > Delete. Selections > Select None. Add a Drop Shadow 3,3,35,3. Delete the original layer. ETAPE 7 frame 3 - Ne rien changer. Ajouter une ombre portée 3,3,35,3. ETAPE 8 orange square - Selections > Select All. Selections > Float. Selections > Defloat.Click on paper Miz_OldeLucky_paper 8, resize to 60% and paste as a new layer. Selections > Invert > Delete. Selections > Select None. Add a Drop Shadow 3,3,35,3. Delete the original layer. ETAPE 9 frame 2 - Leave as it is but add a Drop Shadow 3,3,35,3. ETAPE 10 yellow strip - Selections > Invert > Delete. Selections > Select None. Add a Drop Shadow 3,3,35,3. Delete the original layer. STEP 11 frame 1 - Leave as it is but add a Drop Shadow 3,3,35,3. STEP 12 green circle - Selections > Invert > Delete. Selections > Select None. Add a Drop Shadow 3,3,35,3. Delete the original layer. STEP 13 large dotted circle - Colorize in black. Adjust > Color > Channel Mixer. Red, Green and Blue at 0%. STEP 14 Place the tube in the middle. Delete what is outside the circle. Add a Drop Shadow 3,3,35,3. ETAPE 15 Elements. Miz_OldeLucky_element 49 - 54%. On top of the tube layer. Click on the big circle (green circle) under the tube layer. Selections > Selectionner All. Selections > Float. Selections > Defloat. Click on element 49. Selections > Invert > Delete. Same Drop Shadow. Miz_OldeLucky_element 19 - on top of yellow circle layer. Same Drop Shadow. Miz_OldeLucky_element 73 - Under the tube layer. Duplicate this layer. Miz_OldeLucky_element 62 - 50%. Bottom left. Same Drop Shadow. Miz_OldeLucky_element 53 - 25%. Same Drop Shadow. Miz_OldeLucky_element 46 - 35%. Same Drop Shadow. Miz_OldeLucky_element 47 - 25%. Same Drop Shadow. Miz_OldeLucky_element 52 - 20%. Same Drop Shadow. Miz_OldeLucky_element 55 - 25%. Same Drop Shadow. Miz_OldeLucky_element 39 - 35%. Same Drop Shadow. Miz_OldeLucky_element 59 - 15%. Same Drop Shadow. Miz_OldeLucky_element 30 - 65%. Same Drop Shadow. Miz_OldeLucky_element 31 - 40%. Same Drop Shadow. ETAPE 16 WordArt - Resize to 90%. I colorized the clover in green and the text in orange. Apply Effects > 3D Effects > Inner Bevel.
Add a Drop Shadow 1,1,35,1 on the word art back. Credits: with a small Pixel font like Pixelette or any other small pixel font. STEP 17 Save your work. Martine 26 February 2019 If you have any questions, don't hesitate to contact me |