|
 |
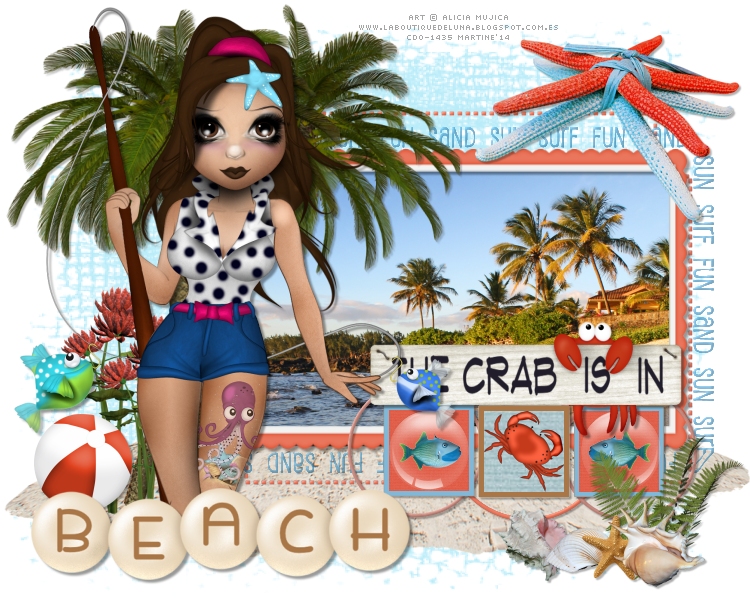
~*~ Summer : The Crab Is In ~*~
(Version française
ICI) |
|
|
 |
|
You can do pretty much what you like with your
result: create signatures with name added, extras or stats, websets. Give all
the credits that are required and for the tut to:
Martine (link to
http://chezmartine.com) for PSP 4 ALL (link to
http://psp4all.com).
This pointing hand is here to help you. You can drag and drop it and use it as a
marker to help with following the tutorial.
Martine
 |

Tubes of your choice, free or not, but credit for them
must be added to your tag. I used a tube ©Alicia Mujica -
www.aliciamujica.blogspot.com.es - that I bought at
CDO.
Template: Template 183 by
HorsePlay's Pasture Designs - Download
here.
Scrapkit: By The Bay by
HorsePlay's Pasture Designs - Download
here.
Mask: Mask 394 by
Insatiable Dreams - Download
here.
One image you are allowed to use. Mine comes from
here:
freeimages. You have to join but it is free.
Plugins: Eye Candy 4000 > Gradient Glow.
Police: Pixelette for the
credits.
You can download my E-Book which will let you work
without being connected.

STEP 1: Template and Mask
Open the template. Windows > Duplicate. Close
the original.
Close the Credit layer.
Close these layers: Layer 1 and
Layer 2.
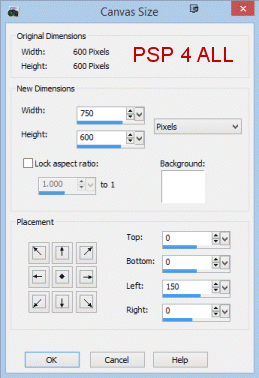
Increase the size of your image. Add 150 on the left. Image >
Canvas Size.
Fill the Background layer with white.
Add a layer and fill with #D9F5FC.
Open Mask 394 by
Insatiable Dreams
and apply. Masks > New > From image - OK.
Then Masks > Delete. In PSP 8 and above, it's under Layers > New Mask Layer >
From Image. OK then Delete.
STEP 2: Layers, Elements and Tube
Drop Shadow: I used
and for the tube, the frame and Wordarts
LAYER 3 - Selections > Select All > Selections > Float> Selections
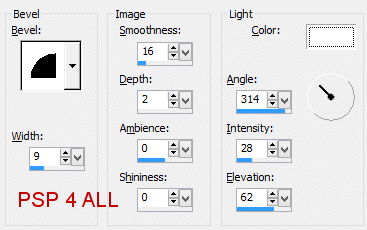
> Defloat. Add a layer and fill with #E76F54. Apply Effects > Inner Bevel
|
 |
Selections > Select None. Close the original layer.
LAYER 4 - repeat what you did for LAYER 3.
LAYER 5 - SAND SUN SURF FUN. Select as before, add a layerand fill with #208BC9.
Inner Bevel. Select None. Close the original layer.
LAYER 6 - Selections. Add a layer. Resize your image/ photo and Copy
Paste into Selection. Select None. Close the original layer.
hpd_BTB_26 - Rotate 90°. Placer above the photo and adjust if necessary
using the Pick Tool (K) or the Deformation tool(D).
LAYER 7 - Selections as before. Add a layer and fill with #E9755B. Add
the same Inner Bevel.
LAYER 8 and LAYER 9 - I kept the colour and apply the same
Inner Bevel.
LAYER 10 - Selections as before. Add a layer and fill with
#208BC9. Select None. Close the original layer.
LAYER 11 - Selections. New layer. Fill with paper hpd_BTB_Paper 5.
Select None. Close the original layer.
Paste the hpd_BTB_38 element, at 30%, as a new layer.
LAYER 12 and LAYER 13 - Same as for Layers 10 and 11.
LAYER 14 and LAYER 15 - Same as before but change the colour and
paper. Fill the frame border with
#A97647 and the inside with hpd_BTB_Paper 3. Add the hpd_BTB_55 element
at 18%.
hpd_BTB_31 - 45%. Top and on the right.
hpd_BTB_54 - 45%. Under the wordart.
hpd_BTB_56 - Above the Mask layer. See my result.
hpd_BTB_49 - 25%. Bottom and on the right.
hpd_BTB_72 - 20%. Bottom and on the right.
hpd_BTB_1 - 25%. Bottom and on the right.
hpd_BTB_8 - 12%. Bottom and on the right.
hpd_BTB_2 - 25%. Bottom and on the right.
hpd_BTB_52 - Image > Flip. 70%. On the left.
hpd_BTB_51 - 70%.
hpd_BTB_46 - 40%. Duplicate.
hpd_BTB_30 - 20%.
Add your tube.
hpd_BTB_35 - 70%.
STEP 3: Credits.
with a small pixel font like Pixelette or any
other small Pixel font.
File > Save.
Martine
17 July 2014
If you have any questions, don't hesitate to contact me
|