You can do pretty much what you like with your result: create signatures with name added, extras or stats, websets. Give all the credits that are required and for the tut to: Martine (http://chezmartine.com) for PSP 4 ALL (http://psp4all.com).

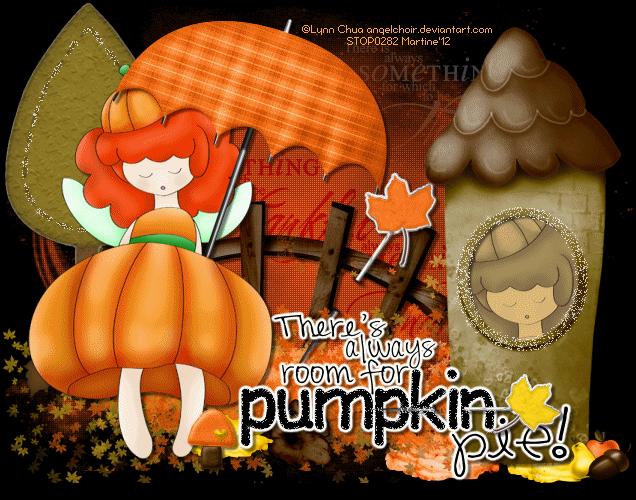
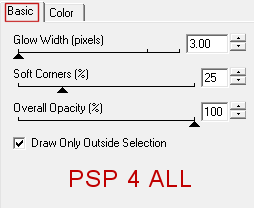
Mask: Mask 29 in Pack 4 by Brutal Designs - Download here. Scrapkit: Harvest of Memories-TS by Crys at Sinfully Creative Scraps - Download here. Word Art: Thanksgiving Word Art by Cupcake Sprinkles & Thanksgiving SWAP by Word Art World. Plugins: penta.com. Eye Candy 4000. Alien Skin Xenofex2. Fonts: FFF Harmony for the credits. You can download my E-Book which will let you work without being connected. STEP 1: Mask and Word Art Open a new transparent image 650x500 in PSP. Fill with black. Add a new layer and fill with #f04d12. Open Mask 29 and apply. Masks > New > From image - OK. Then Masks > Delete. In PSP 8 and above, it's under Layers > New Mask Layer > From Image. OK then Delete. Apply penta.com > color dot
Select the Word Art There is always something to be Thankful by Cupcake Sprinkles and resize to 30%. First copy: select Soft Light under Layers > Properties. Second and third copies: select overlay under layers > Properties. STEP 2: Elements and tube Once each element is resized, sharpen if necessary: Adjust > Sharpen > Unsharp Mask
Then add a drop shadow: I used
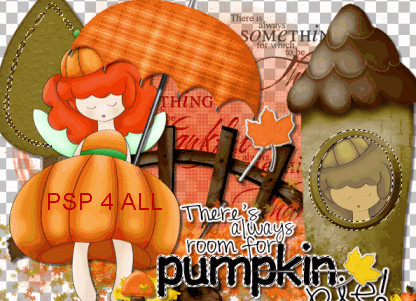
HOM_Element_17 - resize at 20% and put on the right, towards the bottom. HOM_Element_18 - 25% and on the right, towards the bottom. HOM_Element_11 - over the ground. HOM_Element_10 - over the ground. HOM_Element_19 - 15% in the middle. Duplicate HOM_Element_17 and place on the left. HOM_Element_30 - 60% in the middle. HOM_Element_12 - 60% on the left. Add your tube. HOM_Element_1 - 50%. Position so that it looks as if your tube is holding it. I duplicated mine and place the copy above the tube. I then deleted the handle at the bottom so it looks as if she is holding behind her back. HOM_Frame_2 - 70%. Click once inside with your magic wand, expand by 4 pixels. Add a layer and fill with #E83B03. Keep selected. Copy paste your tube as a new layer. Selections > Invert. Click on Delete. Selections > Select None. Click on Effects > Artistic Effects > Aged Newspaper. Amount to age - enter 100. HOM_Element_29 - 14% in front of your tube. HOM_Element_5 - 50%. Rotate right 30° and place on the fence. Add the other Word Art There's always room for Pumpkin pie! Apply an Eye Candy 4000 Gradient Glow.
HOM_Element_6 - 50%. Rotate 90° right. Place on top of the word Pumpkin. HOM_Element_33 - resize at 10% and put on the right, towards the bottom. HOM_Element_32 - 10% on the right, towards the bottom. HOM_Element_31 - 12% in front of the apple and pear. STEP 3: Credits with a font like FFF Harmony, antialias off. STEP 4: Animation Activate HOM_Frame_2 and then click on your magic wand. Set the tolerance at 8 or 10 and the feather at one. Keep the finger of your left hand on the Shift key while your selection all around the frame - the darker green circle around the opening. Keep selected. Move onto the Word Art layer and select the word Pumpkin, one letter at a time, your left index finger still on the shift key. Keep the selection. Move onto the tree layer and select the stitches on the tree, one at a time. Keep your left finger on the Shift key. You should now have three elements selected: around the frame, the word pumpkin and the stitches on the tree - see below.
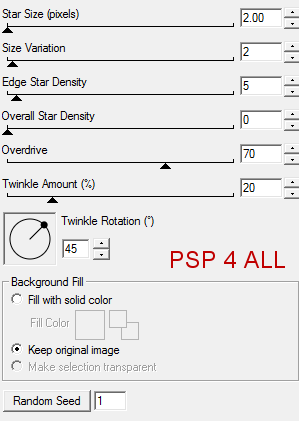
Keep selected. Close the background layer and merge visible. Apply Xenofex 2 > Constellation. Random seed at 1.
OK. Selections > Select None. Copy paste into Animation Shop. Back to PSP. Click on undo. And re-apply the Constellation effect. Click on Random Seed. OK. Selections > Select None. Copy paste after Current frame in AS. Back in PSP. Click on undo. Re-apply the Constellation effect and again click on Random Seed. OK. Selections > Select None. Copy paste after Current frame in AS. You have 3 frames in AS. Click on the first frame then Edit > Select All. Click on Animation > Animation Properties. Canvas Color > Opaque and black. Click on View Animation to check that you are happy with the speed. If you are happy, click on File and save. Martine 1 November 2012 If you have any questions, don't hesitate to contact me |