You can do pretty much what you like with your result: create signatures with name added, extras or stats, websets. Give all the credits that are required and for the tut to: Martine (link to http://chezmartine.com) for PSP 4 ALL (link to http://psp4all.com).
 Scrapkit: I love you Kit at Designz by Anorie. Download here. Mask: Vix_Mask13. Download here. Wordart: mine. Download here. Fonts: FFF Estudio Extended and Fiolex Girls for the 2 texts, Pixelette for the credits. You can download my E-Book which will let you work without being connected. STEP 1: Elements and Tube Open an image 750 x 550. Fill with white. Drop Shadow: I used
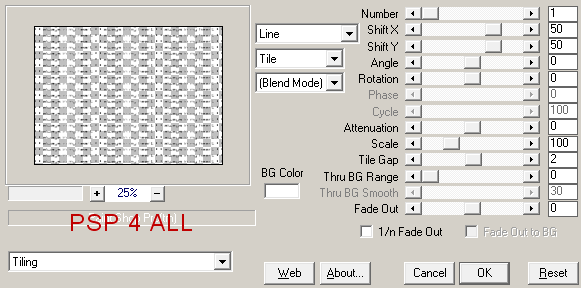
Text: mine * Always in my heart or one of your choice. Open a new image 750x550. Click on the Text tool, font Visitor FFFEstudio Extended. Vector. Type your text. Then click on Objects > Align > Center in canvas. Then click on Layers > Convert to Raster Layer. Apply Mura Meister > Copies. In the Preset Menu at the bottom, on the left, choose Tiling. Leave the default settings except for Tile Gap, replace the 0 by 2.
frame03 - 75% element34 - Rotate 90° left. element26 - Towards the left. See my result. Duplicate. Image > Mirror.Place on the right, move a bit lower down. element16 - 65%. On the left. element20 - 40%. Duplicate. In the middle. element06 - 50% - On the right. element21 - 60%. On the left. element10 - 65%. On the right. Add your tube on the left. STEP 2: Text and Credits Text of your choice or your name, using the Fiolex Girls font. Apply Eye Candy > Gradient Glow:
Credits using the Pixelette font or any other pixel font. STEP 3: Wordart Open the wordart. Place the Love word at the top, on the right. Place the hearts at the top, in the corner on the right. Name them Coeurs1. Duplicate twice. Place a copy on the left, at the top and in the corner = Coeurs2. And the other copy at the bottom, on the left and in the corner = Coeurs3. Duplicate Hearts1, Hearts2 and Hearts3. Activate the Hearts1 layer. Image > Resize 95%. Activate the Hearts2 layer. Image > Resize 95%. Activate the Hearts3 layer. Image > Resize 95%. Close these 3 layers. STEP 4: Animation Close the white background layer. Merge visible all the other layers: elements, tube, text and credits, Love wordart and the 3 layers with hearts - Hearts1, Hearts2 and Hearts3. File > Save As = AniHearts1. Click on the Undo arrow. Close the 3 layers Hearts1, Hearts2 and Hearts3. Ouvrir les 3 copies de Hearts1, Hearts2 et Hearts3. Merge visible and Save As = AniHearts2. Animation Shop Click on File > Animation Wizard. A window opens: Same size as the first image frame > Next. Opaque and choose white #FFFFFF > Next. Centered in the frame and With the canvas color > Next. Yes, repeat the animation indefinitely and enter 40 for Dispaly time > Next. 5th window and time to add your 2 images. Click on Add Image and navigate to go and fetch AniHearts1. Click again on Add Iamge and again navigate to go and fetch AniHearts2 > Next. Last window. Click on Finish. View the animation. If everything is OK, then click on File > Optimisation Wizard. Martine 28 January 2015 If you have any questions, don't hesitate to contact me |