|
|
(Version française ICI) |
|
|
|
|
|
|
|
You can do pretty much what you like with your result: create signatures with name added, extras or stats, websets.
|
Martine |

Template by Mirella at Scrapity Scrap and More - ssam_HalloweenTemp8 in Halloween Templates Set 2.
Mask: Vaybs Mask HW06 à Designs by Vaybs.
Plugins: Alien Skin Eye Candy 4000 ici à Alien Skin - Penta colordot - Xero Fritillary.
Fonts: Cramps et Pixelette.
You can download my E-Book which will let you work without being connected.
STEP 1 - Masque
Open the template and duplicate. Close the original.
Make it bigger. Click on Image > Canvas Size and enter: 800X600.
Delete the Credits layer (Raster 16). And activate the white background: Raster 1. Fill this layer with black #000000. I would prefer a black background for the Results page.
Mask : Add a layer and fill with one of the colours from your tube - choose a light colour. I used #DEEBF2.
Open Vaybs Mask HW06. Click on your work and Masks > New > From image - OK. Then Masks > Delete. In PSP 8 and above, it's under Layers > New Mask Layer > From Image. OK then Delete.
STEP 2 - Raster 2
Activate Raster 2 - Selections > Select All > Selections > Float > Selections > Defloat and fill with a gradient: #000000 for the background and use one of the colours from your tube for the foreground: I used #80BCD6, a darker shade than the blue I used previously. Set the Angle at 30 and Repeats at 5.
Then apply Xero Fritillary :
|
|
STEP 3 - Raster 15
Leave as it is.
STEP 4 - Copy of Vector 4
Activate Copy of Vector 4 - Selections > Select All > Selections > Float > Selections > Defloat. Fill with the same tube colour used in the gradient and apply Eye Candy 4000 Gradient Glow :
|
Eye Candy 4000
Gradient Glow |
|
STEP 5 - Raster 3
Activate Raster 3 - Selections > Select All > Selections > Float > Selections > Defloat. Fill with a gradient made with black and another colour taken from your tube. I used a red colour #8C1035 and kept the Angle at 30 and Repeats at 5.
Then apply Penta color dot:
|
|
STEP 6 - Copy of Vector 2
Activate Copy of Vector 2 - Selections > Select All > Selections > Float > Selections > Defloat. Fill with black #000000 and apply a gradient Glow:
|
|
STEP 7 - Raster 4
Activate Raster 4 - Selections > Select
All > Selections > Float > Selections > Defloat. Fill with the same
gradient used in Step 6 and apply the same Gradient Glow.
STEP 8 - Raster 14
Leave
as it is.
STEP 9 - Copy of Vector 1.
Activate Copy of Vector 1
- Selections > Select All > Selections >
Float > Selections > Defloat. Fill with black #000000 and
apply the same Gradient Glow used in Step 6.
STEP 10 - Rasters 5
Activate Raster 5
- Selections >
Select All > Selections > Float > Selections > Defloat. Fill with
a gradient made with black #000000 for the foreground this time and the really pale shade of blue used
before as background. Same settings.
Then apply the Blinds effect. Effects >
Texture Effects > Blinds:
|
|
And then the same Gradient Glow.
STEP 11 - Rasters 11, 12, 13
Move the opacity back to 100% on the Layer Palette for all three layers.
Then fill with colours taken from your tube. I used red #BB0D43 and blue #35718B.
Selections > Select All > Selections >
Float > Selections > Defloat on each layer before filling.
Then apply Penta color dot:
|
|
And apply the same Gradient Glow on each layer.
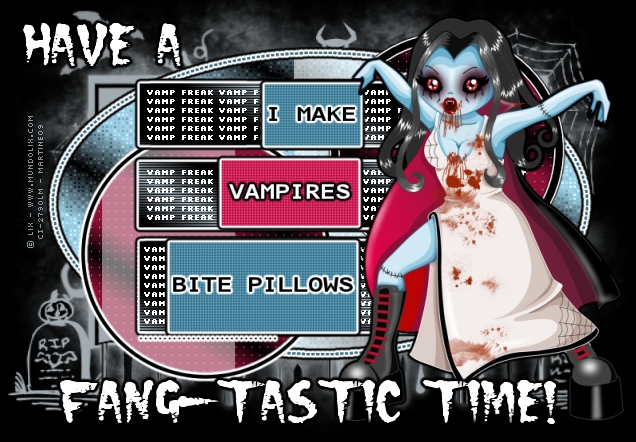
STEP 12 - Rasters 7 et 8 - Texte 'I make' et 'Bite Pillows'
Selections > Select All > Selections > Float > Selections > Defloat. Fill with black and apply the same Gradient Glow as in Step 6.
STEP 13 - Rasters 9 et 10
Selections > Select All > Selections > Float > Selections > Defloat and fill with black. Then apply the same Gradient Glow.
STEP 14 - Raster 6 -Texte 'Vampires'
Selections > Select All > Selections > Float > Selections > Defloat. Fill with white and apply this Gradient Glow :
|
|

STEP 15
Apply this
same gradient above to these layers:
Rasters 4 et 5; Rasters 11, 12, 13.
STEP16 - Your tube
I have also applied the gradient Glow used in Step 14 to my tube.
STEP 17 - Resizing
File > Save.
Now click on Image and Resize to 80%. Make sure that
All layers is checked. And save again, adding _80 to the name.
STEP 18 - Le texte Vamp Freak
Ouvrir une image 400x300
Prendre l'outil Texte :
Colour #FFFFFF - Font
Pixelette - Size 6 - Bold and Vector.
Click on Objets >
Align > Center in canvas.
Layers > Convert to Raster layer. Apply Mura's Meister Copies:
Choose Tiling in the Menu on the left and set as below:
Click back on your work, and activate Raster 5.
I am going to copy paste the text three times because I want the lines of text
to be aligned neatly in the middle of each rectangle.
Copy the text Vamp Freak as a new layer and position it so the first few lines
of the text fit nicely in the middle of the first rectangle. Use the Lasso tool
- Point to Point to select all the text below that is not needed and delete.
Repeat
for the second rectangle, the rectangle in the middle of Raster 5: copy the text
and position it so that it fits neatly in this second rectangle and delete what's
not needed.
And repeat for the 3rd rectangle, the rectangle at the bottom
of Raster 5.
STEP 19 - Name and Credits
Name: Do not leave your tag without any text.
Add your name with
the font Cramps or one of your choice- #FFFFFF. Size 48 and Bold.
Then apply the Gradient glow of Step 14.
Credits: for your tube with Pixelette size 6.
STEP 20 - The end
Check
your work and reposition the layers if needed.
Merge visible and export
using the JPG Optimizer.
Martine
8 October 2009
If you have any questions, don't hesitate to contact me
![]()
![]()