You can do pretty much what you like with your result: create signatures with name added, extras or stats, websets. Give all the credits that are required and for the tut to: Martine (link to http://chezmartine.com) for PSP 4 ALL (link to http://psp4all.com).
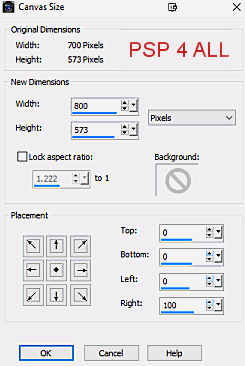
 Template 724 by Millie of Millie's PSP Madness. Download here. Le scrapkit: Winter Fun at Melissaz Creationz. Download here. Backgrounds: Snow day offered by http://farfarhill.blogspot.ca/Far Far Hill - Download here. Mask: Mask 21 at MoonBeams and Spiderwebs. Download here. Snow: Download here. Eye Candy 4000 > Gradient Glow. Font: Pixelette for the credits. You can download my E-Book which will let you work without being connected. STEP 1: Mask and layers Open the template. Window > Duplicate. Close the original. The template is 700 x 573. Increase the size. Image > Canvs Size. New dimensions: Width 800, Height 573. Placement: 0 everywhere and 100 on the right.
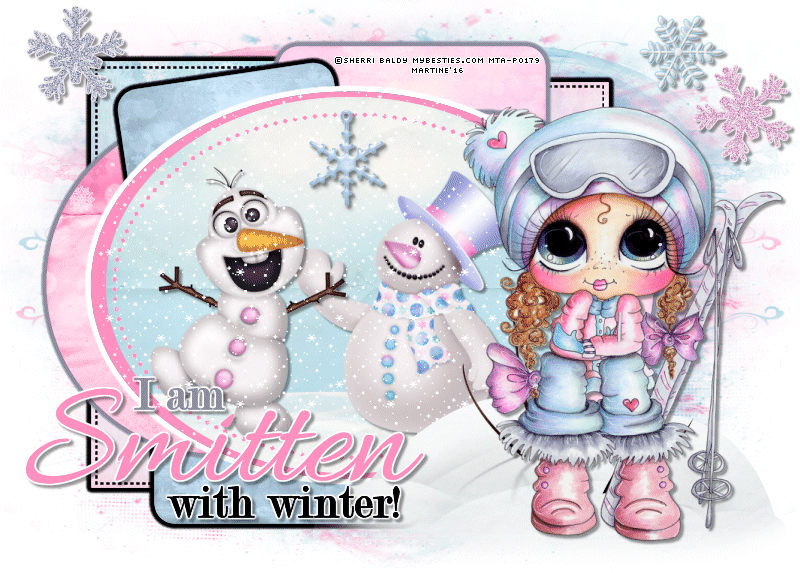
Drop Shadow: I used
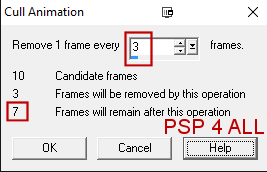
Background - white. Add a layer and fill with pink #FF90C0 or the colour of yopur choice. Open the mask Moonbeams and Spiderwebs Mask 21 and apply. Masks > New > From image - OK. Then Masks > Delete. In PSP 8 and above, it's under Layers > New Mask Layer > From Image. OK then Delete. Add a layer. Fill with blue #83C2D7 or coloujr of your choice. Apply the same mask then Image > Mirror. Layer 1 - Selections > Select All. Selections > Float. Selections > Defloat. Copy paste paper 002 in the selection. Add a layer and fill the selection with a gradien blue-pink, angle at 57° and Repeats 0. Change the layer properties and set on Hard Light. Selections > Select None. Apply Eye Candy > Gradient Glow. Color = Fat but change white for black #000000. Basic = Enter 5.00 for the Glow Width. Layer 2 - Leave as it is. Layer 3 - Selections > Select All. Selections > Float. Selections > Defloat. Copy paste paper 002 in the selection. Add a layer and fill the selection with a gradien blue-pink, angle at 57° and Repeats 0. Change the layer properties and set on Hard Light. Selections > Select None. Apply Eye Candy > Gradient Glow. Fat and Black, as before. Layer 4 - Leave as it is. Layer 5 - Selections > Select All. Selections > Float. Selections > Defloat. Copy paste paper 001 in the selection. Add a layer and fill the selection with pink #FF90C0. Change the layer properties to Overlay to change the colour of the paper, to match it to one of the colours of the tube. Selections > Select None. Apply Eye Candy > Gradient Glow. Fat but change the colour to blue/ grey #8B8E9F. Layer 6 - Selections > Select All. Selections > Float. Selections > Defloat. Copy paste paper 001 in the selection. Add a layer and fill the selection with blue #C7E2F5. Change the layer properties to Couleur to change the colour of the paper, to match it to one of the colours of the tube. Selections > Select None. Apply Eye Candy > Gradient Glow. Fat and black #000000. Layer 7 - Selections > Select All. Selections > Float. Selections > Defloat. Copy paste paper 003 in the selection. Add a layer and fill the selection with pink #FF90C0. Change the layer properties tor Couleur. pour changer la couleur du papier pour assortir ŕ une des couleurs du tube. Selections > Select None. Apply Eye Candy > Gradient Glow. Fat and colour blue/ grey #8B8E9F.. Layer 8 - As for Layer 6. Layers will not be visible on my tag as they are behind the tube but if you use a different tube... Layer 9 - As for Layer 7. Layer 10 - As for Layers 8 and 6. Layer 11 - Fill with pink #FF90C0 and apply Eye Candy > Gradient Glow white #FFFFFF. Layer 12 - Selections > Select All. Selections > Float. Selections > Defloat. Copy paste paper 004 in the selection. Add a layer and fill the selection with blue #C7E2F5. Set this layer on Screen and opacity at 75% to soften the colours. Layer 13 - Selections > Select All. Selections > Float. Selections > Defloat. Copy paste paper 003 in the selection. Add a layer and fill the selection with pink #FF90C0. Selections > Select None. STEP 2: Word Art and Credits Word Art: Colour the text, I used pink for Smitten and blue/ grey for I am. Merge vivisle these 2 layers and move left towards the bottom. Credits: with the Pixelette font or any other small pixel font. STEP 3: Elements and tube MC_OS_WinterFun_E08 - 75%. On the right, above Layer 13. Image > Mirrorr. MC_OS_WinterFun_E07 - 70%. On the left. Image > Mirror. MC_OS_WinterFun_E30 - 50%. On the right. MC_OS_WinterFun_E21 - 45%. Top right. MC_OS_WinterFun_E20 - 45%. On the right. MC_OS_WinterFun_E19 - 45%. On the left. MC_OS_WinterFun_E05 - 50%. On the left, on the text I am. MC_OS_WinterFun_E03 - 45%. In the middle, at the top. MC_OS_WinterFun_E20 - 45%. On the right. Add your tube on the right. MC_OS_WinterFun_E28 - 40%. next to your tube, on the left. STEP 4: Animation Highlight Layer 12. Selections > Select All. Selections > Float. Selections > Defloat. Open the Snow File. Edit > Copy frame 1. Back to your working canvas and click on layer 12. Copy Frame 1. Rename Snow 1. Back to the Snow file and click on frame 2. Edit > Copy frame 2. Back to your working canvas and paste Frame 2, above 1. Rename Snow 2. Repeat these steps until you have pasted and renamed all 10 layers from your Snow file. ------------------- Now back on your working canvas, highkight Snow 1, the click on Selections > Invert and Delete. Move onto Snow 2 and click on Delete. Then Snow 3 and click on Delete. Repaet for all the Snow layers. Selections > Select None. ------------------- Close all Snow layers 1 to 10. Open Snow 1 and merge visible with all the other layers. Copy paste in Animation Shop Back to PSP. Click on Undo and close Snow 1. Open Snow 2. Merge visible. Copy paste this image in AS after Current Frame. Retour dans PSP. Cliquer sur Annuler la derničre commande et fermer Neige2. Ouvrir Neige3. Fusionner visible. Coy paste this image in AS after Current Frame. And repeat until you have merged all 10 Snow layers2 and you have 10 frames in Animation Shop. Animation Shop: The file is heavy so you can remove some of the frames. Edit > Select All. Animation > Cull. In the window, remove 1 frame every 3 frames. You will be left with 7 frames.
Click on File > Optimization Wizard. File > Save. Martine 27 January 2016 If you have any questions, don't hesitate to contact me |